INSTALLATION OF MICROSOFT LYNC:
Microsoft
Lync (formerly Microsoft Office Communicator). Microsoft Lync
is enterprise software. Microsoft Lync Online will be available as part of Microsoft
Office 365, for businesses of all sizes. Because Lync’s open platform provides
extensive interoperability across a wide variety of operating systems, it is
expected that Lync-based solutions will develop across a wide spectrum of
personal computing devices, browsers and mobile devices. Below are the steps,
which tell us about the installation of Microsoft Lync.
Click the link https://portal.microsoftonline.com in
the browser window. If you are a new
customer, you need to provide the user Id and the password. Once done with it,
the below page opens as provided in the screen shot

Click the Install Lync 2010, it opens
into a window where we can install the Microsoft Lync. Check the OS which you have
installed on your Computer and download the version according to it.

Once the Lync setup is downloaded,
install it. At certain point of time, the user will not be able to login to
Microsoft Lync. It prompts for additional software required to login, which
will be found in the below link.
Run the msoidcli.exe which is the additional
software required for Microsoft Lync. Now the user can login and add the
contacts.
CREATION OF CUSTOM LISTS ON THE SITE:
The custom list is created for the
excel sheets .The list is created in the below site.
The Custom List is created in the below manner.
Navigate as below in the browser page
- Site Actions --> More Options --> Lists --> Custom List.
- Give the name of the List that you want to create. Once it is created, you can find the newly created list appearing in the left control panel. Columns can be added to the newly created list as provided below.

- Click the list tab on the horizontal bar, Create the new columns specifying the data type for the column.
- There will be certain column names by default, these columns can be hidden or deleted as per our requirements.
- Modifications to the created list can be made through the List Settings tab.

Once the List is completely created,
new items can be added to the list and it appears in the SharePoint. When we
click the “Add new item” the following page opens where the user can enter the
details. Sample screen shot is provided below. The * indicates the mandatory
field.

This completes the creation of the list. The
data is saved in item list.
HOW TO CREATE USERS:
We have the ability to create users for the portal
and delete from the portal. Users can be
created through the below steps.
- Click the below link , which is the main source of navigation :
the
top of the page we can find the Admin tab.
Just click on it, which takes us to Admin page.
- Towards the left panel, we can find the Admin overview where the users link is present.
- A new page opens where we can create and manage users for the company. We can also add bulk users. Click the New button present above or below the view. Click as New user.
- We can add the First name, Last name, Display name, User name for the new user.
Example is shown:
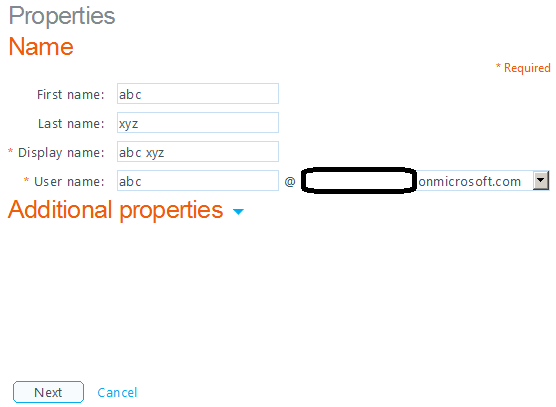
- There appears the Additional Properties tab, which can be filled if needed.
- To proceed further, click the next button which takes us to a page to assign permissions for the user. By default it will be “No”, we need to click the radio button “Yes” to assign the administrative permissions for the user.
- Set the user location, in the example it’s been set to India. Click the Next button, where we need to Assign Licenses.
- We are assigning licenses for Microsoft Office 365 Plan P1. There are various plans,
But
we work on with Plan P1 and also see to that all the three checkboxes are
checked in Lync
Online (P1), SharePoint
Online, Exchange Online. Click
the next button which takes us to a page where we can send email.

Click the create button which creates
a new user.
OTHER FUNCTIONALITY PROVIDED TO USERS:
Apart from creating the users, we can
also delete the users from the portal.
Select the user who needs to be
removed from the user group. Click the check box of the user.
Example of this is shown below in the
screen shot.

We can delete the user, edit the user
by assigning the licenses. Reset the password for the user.
No comments:
Post a Comment