Pages

Wednesday, October 10, 2012

Integration of SharePoint 2010 and Project Server 2010


  • Click on ProjectServer2010.exe file, you will get below screenshot. Below the Install Section, you will find the Install Software Prerequisites, Click on this.


  • You will get below Screen, listing with products required to install Project Server. Click on Next


  • Click on the Checkbox of Accept Terms and Conditions, Click Next.


  • Now, above mentioned Products will get installed. After everything is completed, Next button gets enabled, Click on Next.


  • You will get the confirmation Screen of installed products. Click on Finish.


  • Now, Click on Install Project Server. You will get below Screen, Click on Check box of Accept Terms and Conditions and Say Continue.


  • You will get below screen, Click on Install Now.


  • Now the Installation starts and gets below screen


  • After Successful Installation, you will get the Completion Screen and Asks for to Upgrade the SharePoint Products Wizard. Click on Finish. After few seconds, the below screen will appear.


  • After successful up-gradation of SharePoint Products, you will get below screen. Say Finish.


  • Open the SharePoint Central Administration -> Click on System Settings in left side pane -> Under Servers Section, Click on Manage Services on Server. 

  • You will get below screen, and can see the Project Application Service Started. If not Click on Start link.


  • After Successful Start of Project Application Service, go to Application Management in left Side Pane -> Under Service Applications Click on Manage Service Application as shown below.


  • You will  find Project Server Service Application, Click on this.


  • You will observe the page with link Create Project Web App Site, Click on this. This gets redirected to below page, give the inputs as mentioned. Here you will observe the four databases which gets created while Provisioning the Project App Web Application.


  • You will observe below screen with respective web application as Provisioned after few minutes.


  • Now browse the respective Site Collection where you will see the default Look and Feel of Project Web Access Site.


This is about the Installation and Configuration of Project Server 2010 with SharePoint Server 2010. Please let me know if any one faces issues.


Tuesday, October 9, 2012

SharePoint 2010 : Sandbox Solution


There is a new type of solution- Sandbox Solution is a new concept introduced in SharePoint 2010. A sandboxed solution is custom code that runs in a safe sandbox. It runs under some standard non-negotiable restrictions, so it can only do certain things and is prevented from doing certain other things. Mostly those certain other things that cause the most headache.

For example If you have code that is more restricted, and better monitored, and less damaging to your server environment in general, you can be more confident when you deploy it. Thus the biggest advantage of sandboxed solutions is that they can be deployed by the site collection administrator of a site collection, and they are deployed directly into the solution gallery in a site collection. Also, if a sandboxed solution does not deploy an assemblies, it can even be deployed by individuals with full control to a site collection. This greatly alleviates the headache of the farm administrator.

·         Rights restricted process
·         Exposes only a sub-set of the Microsoft.SharePoint namespace
·         CAS policy limits functionality (For example: you may access SPSite and below only, you may not elevate)
·         We can use OpenXML with an event receiver to remove all comments from word documents uploaded to a site.

For more info:-

For Basics and detailed info http://blah.winsmarts.com/2009-12-SharePoint_2010_Sandboxed_Solutions__The_basics.aspx

Developing, Deploying, and Monitoring Sandboxed Solutions in SharePoint 2010  http://msdn.microsoft.com/en-us/magazine/ee335711.aspx

Monday, October 8, 2012

Introduction of Office 365

INSTALLATION OF MICROSOFT LYNC:

              Microsoft Lync (formerly Microsoft Office Communicator). Microsoft Lync is enterprise software. Microsoft Lync Online will be available as part of Microsoft Office 365, for businesses of all sizes. Because Lync’s open platform provides extensive interoperability across a wide variety of operating systems, it is expected that Lync-based solutions will develop across a wide spectrum of personal computing devices, browsers and mobile devices. Below are the steps, which tell us about the installation of Microsoft Lync.
Click the link https://portal.microsoftonline.com in the browser window. If you are a new customer, you need to provide the user Id and the password. Once done with it, the below page opens as provided in the screen shot


     Click the Install Lync 2010, it opens into a window where we can install the Microsoft Lync. Check the OS which you have installed on your Computer and download the version according to it.


Once the Lync setup is downloaded, install it. At certain point of time, the user will not be able to login to Microsoft Lync. It prompts for additional software required to login, which will be found in the below link.


Run the msoidcli.exe which is the additional software required for Microsoft Lync. Now the user can login and add the contacts.


CREATION OF CUSTOM LISTS ON THE SITE:

The custom list is created for the excel sheets .The list is created in the below site. 

                  http://a2zdinesh.sharepoint.com/teamsite/

The Custom List is created in the below manner. Navigate as below in the browser page 
  • Site Actions --> More Options --> Lists --> Custom List.
  • Give the name of the List that you want to create. Once it is created, you can find the newly created list appearing in the left control panel. Columns can be added to the newly created list as provided below.


  • Click the list tab on the horizontal bar, Create the new columns specifying the data type for the column.
  • There will be certain column names by default, these columns can be hidden or deleted as per our requirements.
  • Modifications to the created list can be made through the List Settings tab.


Once the List is completely created, new items can be added to the list and it appears in the SharePoint. When we click the “Add new item” the following page opens where the user can enter the details. Sample screen shot is provided below. The * indicates the mandatory field.


This completes the creation of the list. The data is saved in item list.

HOW TO CREATE USERS:

We have the ability to create users for the portal and delete from the portal.  Users can be created through the below steps.

  • Click the below link , which is the main source of navigation  :


       the top of the page we can find the Admin tab. Just click on it, which        takes us to Admin page.

  • Towards the left panel, we can find the Admin overview where the users   link is present.
  • A new page opens where we can create and manage users for the company. We can also add bulk users.  Click the New button present above or below the view. Click as New user.
  • We can add the First name, Last name, Display name, User name for the new user.

Example is shown:


  • There appears the Additional Properties tab, which can be filled if needed.
  • To proceed further, click the next button which takes us to a page to assign permissions for the user. By default it will be “No”, we need to click the radio button “Yes” to assign the administrative permissions for the user.
  • Set the user location, in the example it’s been set to India. Click the Next button, where we need to Assign Licenses.
  • We are assigning licenses for Microsoft Office 365 Plan P1. There are various plans,

But we work on with Plan P1 and also see to that all the three checkboxes are checked in Lync Online (P1), SharePoint Online, Exchange Online. Click the next button which takes us to a page where we can send email.


Click the create button which creates a new user.

OTHER FUNCTIONALITY PROVIDED TO USERS:

Apart from creating the users, we can also delete the users from the portal.
Select the user who needs to be removed from the user group. Click the check box of the user.

Example of this is shown below in the screen shot.


We can delete the user, edit the user by assigning the licenses. Reset the password for the user.

Sunday, October 7, 2012

How to create an InfoPath List form and publish in to SharePoint list

Step 1:  Go to All programs à Open MS Office and click on Microsoft InfoPath Designer 2010.

Step 2: Click on File à New à double click on SharePoint List


Step 3: Enter the location of the SharePoint site 


And Click on Next

Step 4:  Create a new SharePoint list and Click on Next and also click on Finish


Step 5:  Design the form based on existing controls


Step 6: File à click on Publish àClick on SharePoint List


It is Showing the message box like yourForm Template was published successfully “


Click on ok
Step 7:  After Form Template was published successfully, go to SharePoint site and Click on “Exp” list from quick launch 


InfoPath data saved into “Exp” list


Friday, October 5, 2012

SharePoint 2010: Integration of SharePoint and SSRS


  • Go to Start -> All Programs -> SQL Server 2008 R2 -> Configuration Tools -> Click Reporting Services Configuration Manager
  • You will be getting below Screen with details of your Server Name and Report Server Instance [Please dont change anything below]. Click on Connect
  • By default, if Report Server is installed, you will be getting below screen with by default details. Here in Report Server Mode, we have two types. One is Native Mode and the other is SharePoint Mode. To integrate with SharePoint 2010, the Report Server Mode should be SharePoint Mode. So, we will create a New database or can Modify/Edit the Existing Report Database details. Click on Database in the Left Pane


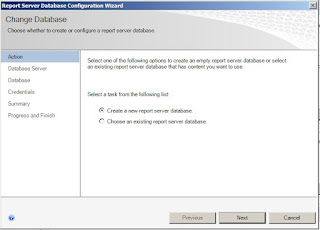
You will be getting below screen. Click on Change Database.


You will be getting below Pop up screen. Choose the First Option as Create a new report server database.


You will be seeing below screen with Server Name and Authentication Type. Change the Authenticate Type and if require Username and Password. For Confirmation, Click the Test Connection, and Click Next.


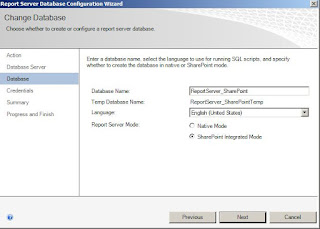
Give the Database Name as you like and Select the SharePoint Integrated Mode. Click Next.


Select the Authentication Type [Preferably the Windows Credentials] Give the Username and Password. Click Next.


  • You will be getting below screen to Verify the details before Processing/Creating the Report Server DB. Click Next.


Now the Report Server will be processed/created accordingly. Please wait till all steps get Success.


After all Six Steps gets Success, the Finish Button gets Enabled. Now the Report Server Database is ready with SharePoint Integrated Mode to integrate with SharePoint Server 2010.


  • Just for Confirmation, Go to Start ->All Programs -> SQL Server 2008 R2 -> Configuration Tools -> Click Reporting Services Configuration Manager -> Click Connect -> You will be getting below Screen. Please verify the Report Server Database Name and Report Server Mode as you given in previous Steps.


Go to Start ->All Programs -> Microsoft SharePoint 2010 Products -> Click SharePoint 2010 Central Administration


Click on General Application Settings in Left Pane, Now Click on Reporting Services Integration under Reporting Services Section. See below screen for detailed info.


Give the Report Server details Configured above, Report Server URL, Select Authentication Mode [Preferably Windows Authentication], Username and Password.Click OK.


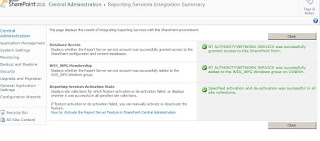
Now the Processing will go and after few minutes you will be getting below screen of Successful Integration between SharePoint 2010 and SSRS.