This post guides not only how to create a HTTPModule but also helps for further steps for my post on Custom Access Denied Page in SharePoint 2013.
For this you need to do three steps,
Step 1:- Add a new class file and extend that one from IHTTPModule. Then copy below code to your .cs file.
public class CustomAccessDenied : IHttpModule
{
public void Init(HttpApplication app)
{
app.PreRequestHandlerExecute += new EventHandler(app_PreRequestHandlerExecute);
}
void app_PreRequestHandlerExecute(object sender, EventArgs e)
{
HttpContext context = HttpContext.Current;
string str = Path.GetFileName(new Uri(context.Request.Url.AbsoluteUri).LocalPath);
if (str.ToLower().Equals("accessdenied.aspx"))
{
string strSourceURL = context.Request.RawUrl.ToString();
strSourceURL = strSourceURL.ToLower().Replace("accessdenied", "customaccessdenied");
context.Response.Redirect(strSourceURL , true);
}
}
public void Dispose()
{
}
}
Step 2:- Now you need to enter in the Modules section in your web.config file. I would recommend to go with IIS UI. For this, select your website and find the Modules Section as below.

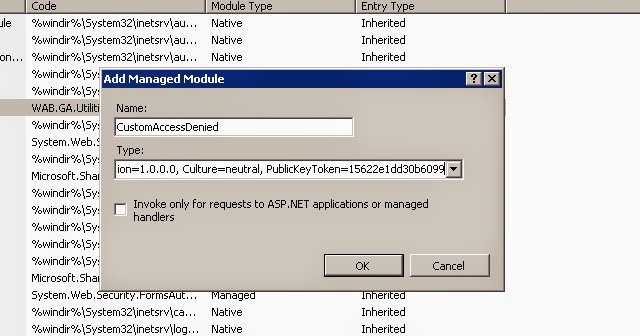
Step 3:- Click on this Modules, and in the right section you will find Add Managed Module Option. Click on that and add Name and Type as below.
For Eg:- Name as CustomAccessDenied
Type as {Your_NAMESPACE}.CustomAccessDenied, {Your_NAMESPACE} ,Version=1.0.0.0, Culture=neutral, PublicKeyToken={Value}
Click Ok.
If this .cs file is not in your existing solution and created separate C# Library Project, need to make sure that you have entry in SafeControls of your web.config file. I would recommend here also not to enter value manually but through VS. Go to Package in your VS Solution and Add the Assembly. Select as YES under safe controls column. This way the value get enters in your web.config file.

For this you need to do three steps,
Step 1:- Add a new class file and extend that one from IHTTPModule. Then copy below code to your .cs file.
public class CustomAccessDenied : IHttpModule
{
public void Init(HttpApplication app)
{
app.PreRequestHandlerExecute += new EventHandler(app_PreRequestHandlerExecute);
}
void app_PreRequestHandlerExecute(object sender, EventArgs e)
{
HttpContext context = HttpContext.Current;
string str = Path.GetFileName(new Uri(context.Request.Url.AbsoluteUri).LocalPath);
if (str.ToLower().Equals("accessdenied.aspx"))
{
string strSourceURL = context.Request.RawUrl.ToString();
strSourceURL = strSourceURL.ToLower().Replace("accessdenied", "customaccessdenied");
context.Response.Redirect(strSourceURL , true);
}
}
public void Dispose()
{
}
}
Step 2:- Now you need to enter in the Modules section in your web.config file. I would recommend to go with IIS UI. For this, select your website and find the Modules Section as below.
Step 3:- Click on this Modules, and in the right section you will find Add Managed Module Option. Click on that and add Name and Type as below.
For Eg:- Name as CustomAccessDenied
Type as {Your_NAMESPACE}.CustomAccessDenied, {Your_NAMESPACE} ,Version=1.0.0.0, Culture=neutral, PublicKeyToken={Value}
Click Ok.
If this .cs file is not in your existing solution and created separate C# Library Project, need to make sure that you have entry in SafeControls of your web.config file. I would recommend here also not to enter value manually but through VS. Go to Package in your VS Solution and Add the Assembly. Select as YES under safe controls column. This way the value get enters in your web.config file.